Wednesday, December 31, 2008

Reauthoring (ripping with changes) a DVD with DVDShrink (preguide for use with Transcode 360)

DVDShrink is a great free tool. Download it here:
http://www.softpedia.com/get/CD-DVD-Tools/CD-DVD-Rip-Other-Tools/DVD-Shrink.shtml

DVDs are encrypted. I use AnyDVD to decrypt the disks. AnyDVD is not expensive, runs in the background, and saves you the work of first decrypting the disk. If you do not want to buy AnyDVD (from slysoft) you can use DVDDecrypter:
http://www.dvddecrypter.org.uk/

Before you begin decrypt the dvd, or have AnyDVD installed and running (you will have a little fox head on the systray to know it is running)

After installing, open DVDShrink.
Insert a DVD into your DVD drive.
Give it a moment to read the disk.
Click the Open Disc button.
You should see your drive and movie listed, choose it.
DVDShrink will analyze the disc.
When it is done you will see something like this:
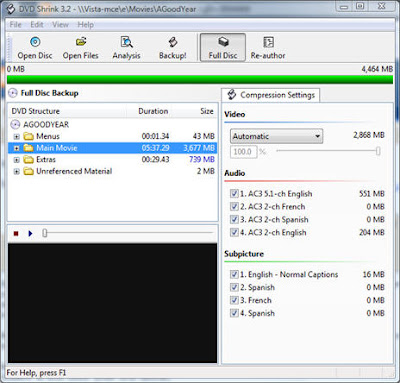


Because I watch movies using Transcode 360 and MyMovies, there are certain things I do to ensure the audio is correct and to not have to sit through all of the trailers. My guide will encorporate this:

Next, click the Reauthor button.
You will see something like this. The main movie is almost always title 1.
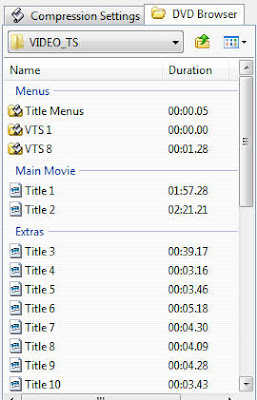

Drag and drop title 1 from the right to the left pane. We've now told DVDShrink we only want the movie itself. If you want to make sure you are getting the right thing, highlight the title and click the play button in the little preview pane and you will see what it is. If it is the type of disc that has both widescreen and normal this will help you determine which is the widescreen and which is the 4:3 version.
Now that you have the movie, click the Compression settings tab. Deselect all of the audio tracks except the one you want. If you are English, you'll want the English 5.1. Since we cannot use subtitles on a transcoded movie, you can deselect all of the subtitles. This will make the final file smaller.

Let me add here, if you want the disc, in it's entirety, you do not need to reauthor just click Full Disk.

Now we have what we want click the backup button. Choose how you want it outputted. If you want .vob files and such, choose Hard Disk. If you want an .ISO, choose .ISO image file. Below that, choose where to write the file(s) to. Click OK.

DVDShrink will now create your movie.

Firewall exceptions for Transcode 360

If you need to manually set your firewall exceptions for Transcode 360 here are the settings:
1) Open port 1401 (TCP).

This is using Control Panel with Classic View under Vista-32 bit

Go to Start>Control Panel>Administrative Tools>Windows Firewall with Advanced Security

On the left highlight Inbound Rules

On the right click click New Rule

Choose Port, Click Next

Dot next to TCP, dot next to Specific local ports. In the box type 1401. Click Next

Dot next to Allow the connection. Click Next

On the ‘When does this rule apply’ you can leave all selected if you want but technically you should only need ‘Private’ if when you set up your media center’s network connection you selected home which is private. Leaving the other boxes selected will not hurt anything.

In the Name box put something like T360

Click Finish.

Now under your inbound rules you will see one with the name you specified above (T360). Double click the rule.

Click the Scope tab.

In the Remote IP Address section put a dot next to ‘These IP Addresses:”.

Click the Add button

Put a dot next to ‘Predefined set of computers:’.

Use the pull down and select ‘Local subnet’.

Click Ok.

Click Ok.

That firewall rule is done. We’ve opened the port 1401 on the Media Center for all local traffic (your house).


2) Add Transcode360.exe and Transcode360Tray.exe to the allowed applications

Actually, I don't know that you need to add the exceptions specified in 2). I noticed that I did not add these to my firewall. I am not at home right now to test, but it may be that just port 1401 is all that is required. If you want to add exceptions for the Trascode processes you can. You can use my instructions above but near the beginning instead of choosing port, choose a program, and then browse to the program (C:\Program Files\Transcode360\Transcode360.exe). The rest of the setting will match the instructions above.

Vista users - if you need help with this have a look at this document:
http://windowshelp.microsoft.com/Windows/en-US/Help/4da18300-9044-47b6-9038-595c78db81ab1033.mspx

If you still need help you can email me aamjohns@[nospam]yahoo.com (remove the [nospam] part.

If you want to enable firewall logging to help troubleshoot have a look at this blog post:
http://tobias-tobin.blogspot.com/2009/02/enabling-firewall-logging-in-vista-for.html

Saturday, December 27, 2008

Unable to Trancode error with Transcode 360

Although there can be more than one cause of this error I want to document one reason that I've been seeing lately. Specifically, this error is caused by certain characters in the folder path that Transcode 360 cannot handle.

Here is an example T360 log highlighting the area of interest:
27/12/2008 9:30:12 AM *VRB* MEncoderTranscoder loaded
27/12/2008 9:30:12 AM *VRB* VLCTranscoder loaded
27/12/2008 9:30:12 AM *VRB* Using optimal resolutions
27/12/2008 9:30:12 AM Spawning: "C:\Program Files\Transcode360\Wrappers\MEncoderTranscoder\mencoder.exe" -quiet -delay 0.2 -oac lavc -srate 48000 -af lavcresample=48000 -of mpeg -mpegopts format=dvd -o "C:\Users\Public\Transcode360\TranscodeBuffer\Iron Man ‑ (Ultimate 2‑Disc Edition).360" -ovc copy dvd://1 -dvd-device "F:\Movies\Iron Man ‑ (Ultimate 2‑Disc Edition)\Iron Man ‑ (Ultimate 2‑Disc Edition).ISO"
27/12/2008 9:30:27 AM *ERR* Transcoding error:
27/12/2008 9:30:27 AM *ERR*
WARNING: OUTPUT FILE FORMAT IS _MPEG_. See -of help.
Couldn't open DVD device: F:\Movies\Iron Man - (Ultimate 2-Disc Edition)\Iron Man - (Ultimate 2-Disc Edition).ISO
No stream found to handle url dvd://1
Cannot open file/device.


Notice the last line 'Cannot open file/device'. This is due to certain characters in the path. Most likely the "(" and ")". Try removing the movie from the Collection Manager. Change the folder path to eliminate the charaters. In the above example rename the Iron Man folder name to just be Iron_Man. Now re-add it to Collection Manger. This time it should work.

New beginner's guide to PowerShell on my GitHub page

 I created a beginner's guide to PowerShell here: https://github.com/aamjohns/Powershell_Guide/blob/main/README.md I hope it helps someo...