Showing posts with label Media Center. Show all posts

Friday, June 28, 2013

New Media Notifier for Media Center and Media Browser

Disclaimer: If you do not want notification messages appearing while watching a movie or TV show, you do not want this tool.

Quick Guide (more details below)

Remember to run these tools as Administrator.  Right click the .exe and choose Run As Administrator unless you have disabled the UAC.

This tool allows one to receive new media notifications while using Media Center.  This tool utilizes the .xml file that are used in a Media Browser configuration.  To get a new movie notification, a movie.xml file will be read.

I wrote this tool for myself.  This application works best if you have an automated system, using tools like SickBeard, CouchPotato, or FileBot.  Or if you want your family downstairs to know that show they want to see is ready.

Requirements


Windows Media Center and .Net 3.5.


Install


This setup utilizes two tools.  One tool simplifies the install and setup of the required MCPopupSend program by Scott (link to his posting about the tool he made).  The second tool runs monitoring specified directories for new media items: movies, and TV shows to appear.

  1. Once each Media Center that you want to show a brief popup message when new media is available, please run the MCPopupEasy tool.
  2. Download the tool, extract the .zip file, and run the .exe inside.  Click the button to install MCPopupSend (you must do this to get messages).  Next, click the button to add the necessary firewall exceptions (you must do this too).  The firewall rules created are set to only be open on the local subnet (all you should need).
  3. The Media Center is now ready to receive broadcast messages and display popup notifications informing of new media
  4. Next, go to the computer that will be used to monitor folders for new content.
  5. Download this NewMediaNotifier tool.
  6. Extract it somewhere.  The program is going to be running all the time from this folder, so put it somewhere it can stay.
  7. Run the NewMediaNotifier.exe
  8. In the Movie Folder section, add the root directories of your movie folders.
  9. In the TV folders, add the root directories of you TV show folders.
  10. Set the amount of time for the message to show when it appears on the Media Center.  The default is 5 seconds.
  11. Choose whether the program should automatically start monitoring when it opens.
  12. Choose whether to have the application open as a small icon in the systray (area down by the clock).
  13. Specify what you want the title of each type of message to be (if you don't like my defaults).
  14. Choose the type of title to show from the xml file for movies, and select whether you also want to see year, rating, or runtime (or all).
  15. Click Start.  Now when new media is written to the monitored locations, the program will wait 20 seconds (to be safe the xml file is no longer being written to) and will broadcast a message to the Media Centers informing of the new content available.
I cannot control anything about the popup except the text.  I cannot remove the OK button, I cannot change color, shape, or transparency.  I also cannot stop the Media Center ding.

I know many of you would not want a message popping up while watching a movie.  Like I said, I wrote this for our home use.  I'm just offering it up.  Our family does not find it un-appealing, and likes knowing when something new just got put up.


Further Information


MCPopup utilizes UDP port 11000 and a firewall program exception needs to be made for ehexthost.exe in the ehome directory.

If you are interested an utilizing the popup to send other kinds of messages you can.  Use the MCPopupEasy tool to prepare the Media Centers.  Then use the MCPopupSend.exe to send whatever messages you want.  Read the post linked about for Scott's description and the command line options.

If you do not want the firewall exceptions, there is a button in the tool that will remove them. 

Do not remove the mcepopup directory from the directory with the executable.  The executable expects it to be there.

If you want the NewMediaNotifier tool running all the time, make a shortcut to it in the Startup folder.

On Vista and Windows 7 put the shortcut here:
C:\ProgramData\Microsoft\Windows\Start Menu\Programs\Startup

On XP:
C:\Documents and Settings\All Users\Start Menu\Programs

Check the two boxes and do the above, and the tool will always run and sit down in the systray, out of the way.

This is what the popup looks like:


It is not actually that big.  I cropped the image.  That is only part of my screen.


Screenshots


MCPopupEasy


NewMediaNotifier


Troubleshooting


If you get an error immediately after opening, you may not have .Net 3.5 installed

If you do not run the programs 'As Administrator' don't expect them to work.

Issues or questions please post in the comments section.

Sunday, September 05, 2010

File not found error playing MKV files on Media Center

I tried the Shark007 codec pack and that didn't work. Then I tried the instructions here and they worked. I thought I would pass this along. Good, easy, instructions for getting .mkv and other filetypes to play on Media Centers x86 and x64.

Sunday, July 18, 2010

Media Browser and Media Center cannot open file error playing movies

What fixed this for me was going into the Media Browser configuration tool and clicking advanced, and then cache. Clearing the items cache fixed the problem.

Also, depending on the types of files you are attempting to play it could be a codec issue. A good solution to this is the Shark007 codec pack. Here's a link for Windows 7. Scroll to the bottom and you will see the download link to 'Major Geeks'.

Tuesday, July 21, 2009

Using Transcode 360 with a 64-bit Media Center

Here's a post with instructions on making it work with x64 Operating Systems. The solution is better than mine because it will work with My Movies and Media Browser.
http://www.hack7mc.com/2009/05/transcoding-in-windows-seven-x64-with-media-browser-and-transcode-360.html
------------------------------------------------------------------------------------------------

This guide is assuming you've already properly setup Transcode 360 1.6.3 on your 64-bit Media Center system. If you need help with that please see this posts:
Using Transcode 360 with My Movies and Media Extenders like Xbox or Linksys
or
Transcode 360 Installer Tool

If you are using a 64 bit operating system, with something like MyMovies, and you choose to Watch Stream, you will most likely get an error. There is a way to transcode movies with a 64 bit operating system.

Put the movies your Videos folder on the Media Center. It needs to be a videos folder your Media Center Library is set to monitor. On your Extender, bring up the Media Center. Browse to the Video Library on the Pictures + Videos section . Choose a movie. Right click the movie (depending on your extender and controller, you'll have to determine what button does this - for example, with an xbox 360 extender you hit the X button) to bring up the More... menu. Choose More... Choose the Transcode option. After you click to transcode, it may seem like nothing is happening. There is a delay. Eventually you should see the blue spinning ring. After another waiting period (while it builds the buffer) the movie should start playing.

I hope this helps some of you with 64-bit Media Centers. You can always use MyMovies or Media Browser to figure out what you want to watch, and then use the method described above to start the playback.

Saturday, May 02, 2009

Playing FLV files on Vista Media Center

I have been informed the instructions below no longer work. It seems most people these days just install the Shark Codec Pack for Windows 7 and flv playback is supported (supposed to be...I personally do not use this codec pack).
http://shark007.net/win7codecs.html

Old instructions...

Here's what I did to be able to play .flv (Flash) files on Vista Media Center.

1) Install FFDShow. In my case, I just installed Vista Codec Package 5.2.2 Final
Whichever you choose should be fine. I got the Vista Codec Package from here:
http://majorgeeks.com/Vista_Codec_Package_d5326.html

Caution - Once I did this, I noticed I lost audio from streamed movies. The codec package may have installed something that disrupted my AC3Filter. After reinstalling AC3Filter I got my audio back in movies. Always be careful when installing codecs. Installing over existing codecs can cause problems.

2)Edited the registry to add this:
Under HKEY_CLASSES_ROOT\.flv create a new registry string REG_SZ called "PerceivedType" and name it "video"
If you want to run a file to do this download this zip, extract it, run the .reg file (when prompted to merge in registry choose yes).

3) Next I copied a test .flv file to Public\Videos folder. I right clicked the file and chose 'open with' and set it to 'always open' with windows media player. When you open the file, WMP may say 'do you really want to open this extension' click OK, and the vid should start in WMP.

4) Next, I went into Media Center, Video Library, found my sample file, clicked it and it played.

Monday, August 11, 2008

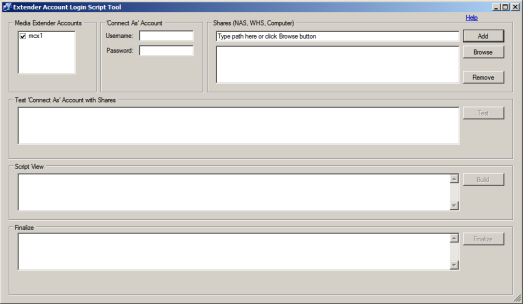
Giving a Media Center Extender access to files on another device (NAS, WHS, Computer) through the Media Center using custom username and password

Downloads

Description

I started creating instructions similar to:
But I decided to try a different route. This time I wrote a program to do the work.


This tool needs to be run on your Media Center PC. Note - You only need to run it once to get everything setup. If at a later time you add another share or device, you can run it again to updated the login scripts.

It can allow your Media Extenders to access other network devices that are sharing files. This includes NAS, Windows Home Server, or another PC (XP or Vista). It works by created login scripts for Media Center Extender accounts on the Media Center that connect to the devices using a different account - one that you specify. Create the account on the other device(s), add it to the shares and then run this tool. This tool works differently than the 2 links above in that it uses a separate account with password to gain access to the shares. The above 2 links describe giving access based on 'all access permissions' like Guest and passwordless public sharing. With this tool, the above two link are somewhat obsolete. Why not just use an account for sharing instead of opening up shares to Guest or Anonymous? This has been tested with MyMovies and Transcode 360.

This tool requires you have .NET Framework version 2 installed for it to work.
Finally, use the tool at your own risk. It is a simple tool. It does not delete anything. It shouldn't mess anything up. But, I don't make any guarantees about this tool.

More Information

Please see the comments section for some questions and answers.

Wednesday, August 06, 2008

Using .ISO files with Media Extenders, Transcode 360, and MyMovies

MyMovies supports watching movies in .iso format. This requires an image mounting software be installed. I used the free software Virtual CloneDrive - http://www.slysoft.com/en/virtual-clonedrive.html

  1. Install the VCD software on the Media Center computer that runs MyMovies.
  2. Open MyMovies Collection Manager
  3. Go to Configure>Image Mounter> it should detect that you have VCD installed. Click Ok.
  4. In Collection Manager the Title should be added just like you are adding a ripped movie. Browse to the folder using Network and select the folder that contains the .ISO file.
  5. If the movie is on the Media Center that is all you do. When watching through My Movies choose Watch Stream. MyMovies will mount the .ISO file and Transcode 360 should transcode it for viewing. If the .ISO is store on a computer other than the Media Center (NAS, WHS, another windows computer), check my instructions below for proper configuration of sharing.

Accessing media stored on a Windows Home Server from an extender, with MyMovies and Transcode 360 running on a separate Media Center

I don't have a WHS so I cannot test what I am writing. Hopefully I will be able to confirm the instructions through feedback.

Setup a share on the WHS to share the movies

The MCE (Media Center Extender) will be connecting to the WHS through a Media Center computer running MyMovies. The easiest way to set this up is using the Guest account.

Share the folder that contains all of your movie folders

1. From WHS Console add a share folder call "Movies" (doesn't have to be called Movies, call it whatever you want) to WHS default shared folders. The folder you share should be the root folder of all of your movie folders.

Enabled the Guest account on WHS

1. Open the Windows Home Server Console.
2. Click the User Accounts tab.
3. Right-click Guest, and then select Enable Guest Account
4. Click Next.
5. Select No Guest Password, and then click Next.
6. Click Read for any shared folder that you would like to have accessed and viewed using Windows Media Center.
7. Click Finish.

So sum this up, you have created a share, called "Movies" that is the folder that contains all of the movie folders. You enabled the Guest account with no password. You added the Guest account to the shared folder with Read access.

I am not sure whether WHS will automatically open the firewall for shared folders. That will need to be done. I'll have to leave that up to you to figure out.

Here is a nice guide to media sharing on WHS. It touches on what we are doing here with the Guest account and sharing. Windows Home Server Media Sharing

The above instructions are nearly identical to what I described the Using Transcode 360 with My Movies and Vista MCE post. It is the same concept. And this will work on more than a WHS box. You can share off another computer in your house. As long as you add the path to the movie properly in MyMovies Collection Manager and the sharing is setup properly, the Extender will be able to play movies off other computers (other than the Media Center computer).

Adding movies shared off other computers (WHS for example) in MyMovies

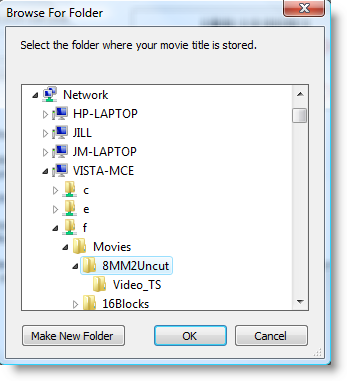
When adding the title, choose 'Add Online' button. Browse the Network for the Computer and Share containing the movie folder you are adding. For example:

Click Ok

And click 'Add to owned, for keeps'

This adds the movie using a UNC path. The path in the example above would be \\vista-mce\f\movies\8MM2Uncut
The path has to be added in this manner, so networked devices can find it. A local path C:\Movies\8MM2Uncut would not work.

Transcode 360 expects there to be a folder that is the name of your movie. Within that folder there needs to be a Video_TS folder, and within that, the actual movie files (.vob, .ifo, etc). If you do not use that folder structure, watching movies with extenders, MyMovies, and Transcode 360 will not work *unless the movie is an .ISO, in which case the Video_TS folder is not necessary).

If you extender was connected to the Media Center while you set all of this up, close its connection to the media center and reopen it.

New beginner's guide to PowerShell on my GitHub page

 I created a beginner's guide to PowerShell here: https://github.com/aamjohns/Powershell_Guide/blob/main/README.md I hope it helps someo...