Showing posts with label media browser. Show all posts

Friday, June 28, 2013

New Media Notifier for Media Center and Media Browser

Disclaimer: If you do not want notification messages appearing while watching a movie or TV show, you do not want this tool.

Quick Guide (more details below)

Remember to run these tools as Administrator.  Right click the .exe and choose Run As Administrator unless you have disabled the UAC.

This tool allows one to receive new media notifications while using Media Center.  This tool utilizes the .xml file that are used in a Media Browser configuration.  To get a new movie notification, a movie.xml file will be read.

I wrote this tool for myself.  This application works best if you have an automated system, using tools like SickBeard, CouchPotato, or FileBot.  Or if you want your family downstairs to know that show they want to see is ready.

Requirements


Windows Media Center and .Net 3.5.


Install


This setup utilizes two tools.  One tool simplifies the install and setup of the required MCPopupSend program by Scott (link to his posting about the tool he made).  The second tool runs monitoring specified directories for new media items: movies, and TV shows to appear.

  1. Once each Media Center that you want to show a brief popup message when new media is available, please run the MCPopupEasy tool.
  2. Download the tool, extract the .zip file, and run the .exe inside.  Click the button to install MCPopupSend (you must do this to get messages).  Next, click the button to add the necessary firewall exceptions (you must do this too).  The firewall rules created are set to only be open on the local subnet (all you should need).
  3. The Media Center is now ready to receive broadcast messages and display popup notifications informing of new media
  4. Next, go to the computer that will be used to monitor folders for new content.
  5. Download this NewMediaNotifier tool.
  6. Extract it somewhere.  The program is going to be running all the time from this folder, so put it somewhere it can stay.
  7. Run the NewMediaNotifier.exe
  8. In the Movie Folder section, add the root directories of your movie folders.
  9. In the TV folders, add the root directories of you TV show folders.
  10. Set the amount of time for the message to show when it appears on the Media Center.  The default is 5 seconds.
  11. Choose whether the program should automatically start monitoring when it opens.
  12. Choose whether to have the application open as a small icon in the systray (area down by the clock).
  13. Specify what you want the title of each type of message to be (if you don't like my defaults).
  14. Choose the type of title to show from the xml file for movies, and select whether you also want to see year, rating, or runtime (or all).
  15. Click Start.  Now when new media is written to the monitored locations, the program will wait 20 seconds (to be safe the xml file is no longer being written to) and will broadcast a message to the Media Centers informing of the new content available.
I cannot control anything about the popup except the text.  I cannot remove the OK button, I cannot change color, shape, or transparency.  I also cannot stop the Media Center ding.

I know many of you would not want a message popping up while watching a movie.  Like I said, I wrote this for our home use.  I'm just offering it up.  Our family does not find it un-appealing, and likes knowing when something new just got put up.


Further Information


MCPopup utilizes UDP port 11000 and a firewall program exception needs to be made for ehexthost.exe in the ehome directory.

If you are interested an utilizing the popup to send other kinds of messages you can.  Use the MCPopupEasy tool to prepare the Media Centers.  Then use the MCPopupSend.exe to send whatever messages you want.  Read the post linked about for Scott's description and the command line options.

If you do not want the firewall exceptions, there is a button in the tool that will remove them. 

Do not remove the mcepopup directory from the directory with the executable.  The executable expects it to be there.

If you want the NewMediaNotifier tool running all the time, make a shortcut to it in the Startup folder.

On Vista and Windows 7 put the shortcut here:
C:\ProgramData\Microsoft\Windows\Start Menu\Programs\Startup

On XP:
C:\Documents and Settings\All Users\Start Menu\Programs

Check the two boxes and do the above, and the tool will always run and sit down in the systray, out of the way.

This is what the popup looks like:


It is not actually that big.  I cropped the image.  That is only part of my screen.


Screenshots


MCPopupEasy


NewMediaNotifier


Troubleshooting


If you get an error immediately after opening, you may not have .Net 3.5 installed

If you do not run the programs 'As Administrator' don't expect them to work.

Issues or questions please post in the comments section.

Friday, August 27, 2010

Saturday, August 14, 2010

Tool for lite movie management when not using MyMovies

I use MediaBrowser and I have movies spread over 6 partitions. When I want to delete one, or browse to one, I have to search for it. I made a tool that will show you all your movies in a list, allow you to open the folder containg the movie, delete the movie, view the images in the movie folder, delete images, and even preview the movie. Each movie clicked on will show the description and the cover image.

I call this tool Where Are My Movies At? wamma for short.

Get it here.

Sunday, July 18, 2010

Media Browser and Media Center cannot open file error playing movies

What fixed this for me was going into the Media Browser configuration tool and clicking advanced, and then cache. Clearing the items cache fixed the problem.

Also, depending on the types of files you are attempting to play it could be a codec issue. A good solution to this is the Shark007 codec pack. Here's a link for Windows 7. Scroll to the bottom and you will see the download link to 'Major Geeks'.

Saturday, July 17, 2010

Media Browser - file cannot be found error when trying to play MKV files

Here is the solution to the problem I found:
1) Install this Divx Codec Plus pack
2) Install AC3Filter

Now my MKV files play and I can hear them. Without the AC3Filter I had no audio. I am getting choppy playback though so I don't know where to point the finger for that problem. Is it my network or is it a codec issue?

Tuesday, July 13, 2010

Movie Backdrops cleanup tool (for use with Media Browser)

I made a tool with the help of BAS Concepts that allows one to view all their backdrops, delete the one's they do not want, and have them auto renamed so they cycle properly in Media Browser. Check it out if you have been looking for a tool like this. It can be downloaded here.

Sunday, June 21, 2009

Script to change or remove genres in movie xml files

Download
Download Scripts

Version change 09/08/2009 - Now removes duplicate genres from an xml file. For example, if it has the genre 'comedy' three times, it will automatically remove the extra two 'comedy' genres.

Intro
There may be a better way to do this, but this is how I've been doing it and I wanted to make it available to others. If you are using Media Browser and go to sort by Genre, there may be genres you don't want. Or there may be genres that you want renamed. The scripts I am posting will allow you to do both, genre substitutions and genre removals from .xml files (ie: mymovies.xml).

I know it's not fun to read a ton of instructions so I will try to make this short, but I recommend you read this so you know how to use the scripts. If you have questions you can post in the comments or email me.

Overview of the scripts

Below is a list of the scripts and what they do. Before you run any of them, you need to edit the settings in the _Settings.txt file.

BuildGenreList.vbs script

I recommend you run this script first. It will look through all of the movie xml files and will build a list of each unique genre. You will use the results of the script (Genres.txt) to tell the next script what to do.

ChangeGenres.vbs script

This script takes your desired changes and implements them by modifying the xml files that need the specified changes.

RestoreFromBackup.vbs script

This script restores the original .xml files before changes were applied. MakeBackup must be =True in the settings file before running ChangeGenres.vbs if you want to make backup copies.

Using the scripts

Start off by extracting the .zip file into a folder. You want all the scripts and related text files to be in the same folder.

Open the _Settings.txt file. There are some instructions inside but basically here's what you will do.

1) Folders line. Here you set the folder or folders you want to run the scripts against. I have 3 folders that have movies, so for me this line reads Folders=E:\Movies,F:\Movies,G:\Movies. If you only have one movie folder (ex: C:\My Movies\Movies) then your's will read Folders=C:\My Movies\Movies. Separate more than one path with a comma (like my example above).

2) File line. This tells the script the name of the .xml file you want to process. For most people this will be mymovies.xml. So it would read File=mymovies.xml
If your setup uses a different .xml file just set it to be the name of your xml file. Ex: File=yourfile.xml

3) ShowCompletedBox line. If you want to know when the script is finished use ShowCompletedLine=True. If you are running the scripts as a schedule task and you don't want interaction, set it to False. If you have a lot of movies, the script will take a little bit. It's not too bad though. In testing it was about 3 minutes to process 100 movies.

4) MakeBackup line. If you want a backup copy of the .xml file before it gets changed, set this to True. Ex: MakeBackup=True. This will create a file called mymovies.xml.bak (or whatever your file is) and will be the .xml file before changes were made to it.

These settings are used by all scripts. So the first thing you want to do is open _Settings.txt file and edit the settings.

Building a list of genres

Now you can run the BuildGenreList.vbs script. While it is running (same goes for the other script) there will be a file in the folder called _StatusLog.txt. Open this file and you can see how far along the script is. While it is open you will not see the new data being written. After you close it you can re-open it and get refreshed progress. Running this script is optional. If you want to skip it, just create a text file called Genres and in it put the stuff you want changed. Something=Something Else to change, or Something=- to remove.

When it completes, and you will get an annoucement if you set ShowCompletedBox=True, you will have a Genres.txt file in the folder. Open it and you should see each genre in your collection.

Making Genre Changes

You will set how you want things changed using the Genres.txt file.

1) To substite a genre use this syntax: something=something else. So if I want Feel Good changed to Comedy I would find Feel Good in the text file and follow it with =Comedy. So, Feel Good=Comedy. That will change any genre called Feel Good to be Comedy.
Example: Suspense/Thriller=Thriller

2) To remove a genre, find it in the text file and follow it with =-. That's an equals sign and then a minus sign. This will completely remove the genre from the xml files.
Example: Monster Movies=-

Now run the ChangeGenres.vbs script. Again, you can check on it's progress by opening the _StatusLog.txt file. This will tell you what movies have been changed and any actions performed. If, in the _Settings.txt file you have MakeBackup=True, when this runs it will make a copy of the xml file before changes with a .bak extension. When the script finishes the _StatusLog.txt file will have a "Done" line

Doing a Restore

Provided you had MakeBackup=True set in the settings file before you ran the ChangedGenres.vbs script, you will have the ability to restore your original .xml files. The RestoreFromBackup.vbs script also uses the settings in the _Settings.txt file to know what directories to run against. You can also have it tell you when done. And, the progress, and changes, are recorded in the _StatusLog.txt file.

Use the scripts at your own risk. During my testing they are working as designed.

Troubleshooting

I have not tested this with Vista's UAC (User Account Control) enabled. If you have the UAC on then you may need to right click the script and choose 'Run as Administrator' before running them.

When you start the Genres.txt file is empty. You need to either run the BuildGenreList.vbs script, or manually edit the file to have your desired changes.

If you specified an invalid folder it will tell you in the _StatusLog.txt file. If you made a syntax error in the Genres.txt file either no changes will occur where the syntax error is, or you will get incorrect results. If something gets blundered, and you had MakeBackup=True, you can run the RestoreFromBackup.vbs script and it will restore you original .xml files.

I do not have On Error Resume Next enabled in the scripts. That way, if an error occurs the script will stop. If that happens, you can write down the error, or take a screenshot and send it to me.


Thursday, June 18, 2009

Graphical User Interface (GUI) for Tyborg's StarkCovers program

Hold up! As of the StarkCovers 6.30.2009 release my gui is once again broke. I'm not doing this anymore. Sorry.

This tool should only be used with StarkCovers version 6.23.2009 or earlier.

Requirements:
1) StarkCovers by Tyborg
2) .Net Framework 2 installed
3) Download my StarkCoversGUI tool and extract it into the same folder as your StarkCovers.exe


Update:
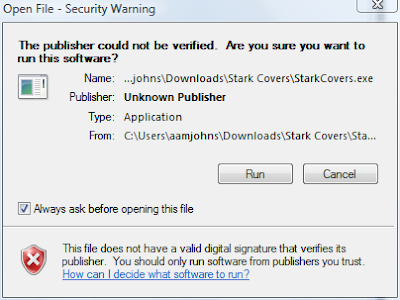
If you already have my tool and you updated your version of starkcovers.exe, you will need to redownload my tool and replace the one you already have. Something was changed in the starkcovers 6.23.2009 version that broke my tool. I have fixed my tool in response to this change. Also, when you click preview you may see this:


Uncheck 'Always ask before opening this file' and click Run. This is part of the problem that occurred with the updated StarkCovers.exe. Windows see's the executable as a program 'from another computer' and does not trust it. This prompt is for you to give permission for starkcovers.exe to be run.

What's it for:
I've been using Media Browser on my new Windows 7 MCE machine. Media Browser is a free media aggregator plugin for Media Center. On the Media Browser forum I saw Tyborg's tutorial for StarkCovers in Media Browser. Tyborg's tool is very cool! After you download it, and extra the files, you run a batch file to modify your movie covers. Being new to all this, I didn't really know what the different options would look like (ex: clearcase, sidelogo, banner, etc). So I spent a good amount of time editing the command line, modifying a single movie cover, and then viewing it in Media Browser. I had to do this to see what I liked and how it looked in Media Browser.

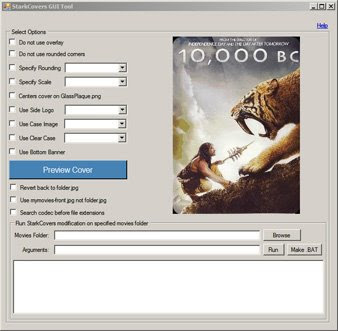
I decided to make a GUI form for Tyborg's program. This GUI offers a couple of conveniences. You can select options, and then do a Preview to get an idea of what the cover will look like. Next, you can run it against a movie folder, or all your movies, by selecting the options, selecting the movie folder, and clicking run. This should be easier to deal with for people not familiar with command lines and such.

This is what the tool looks like:


Using:
After you have downloaded the GUI tool and put it in the same folder as your StarkCovers.exe, run the StarkCoversGUI.exe. This tool expects a "Sample" folder in the same directory it runs from. The first time you click Preview, if the Sample folder is not there, it will prompt you about it, and give you the option of automatically creating the folder.

Next, this tool expects there to be at least a folder.jpg file in the Sample folder. This is what the tool will use to generate previews. Copy the folder.jpg file from one of your movies and put it in the Sample folder, or, the tool will offer to download one into the folder for you (it's a 10,000 BC cover). Also, if you want to test with the mymovies.xml functionality, put one of the xml files in the Sample folder also, or, when you let it download the samples I posted, it will get a mymovies.xml for you.

Now the tool should be ready to go. Choose options and click Preview Cover button to get an idea of what the cover will look like. This just gives you an idea. The image has been shrunk and it may not look as good as it will in Media Browser. But, it give you an idea. Also, if you want to see a better image, click the Preview image and an unshrunk copy of the image will be shown.

If you want to use arguments I have not precreated checkboxes for, you can type them in the Arguements box. Both Preview and Run will use what is in the Arguments box.

If you want to change your sample cover, copy a new folder.jpg to the Sample folder. Whatever you want to use as your sample for previewing is obtained from the Sample folder.

When you are ready to apply the StarkCovers look to your movie covers, choose a Movie Folder. The path can be typed or browsed to using the Browse button. Choose the root folder of all your movies to have the StarkCovers look applied to all movies contained within. If you just want to modify one movie, choose its folder.

Once the options are selected, and the movie folder is selected, click the Run button and StarkCovers will run using the selected settings.

To undo, select the Revert back to folder.jpg options and run again.

To export settings to a .bat file, click the Make .BAT button.

Just a heads up, the conversion process can take a while. While it is running, the Run button will remain greyed out. When it is finished, you will see "Job complete" in the box at the bottom and the Run button will become available again.

Troubleshooting:
If you get the error "The application failed to Initialize properly (0xc0000135)" it means most likely you need to install .Net Framework 2 or update your .Net Framework 2 (service packs or updates).

New beginner's guide to PowerShell on my GitHub page

 I created a beginner's guide to PowerShell here: https://github.com/aamjohns/Powershell_Guide/blob/main/README.md I hope it helps someo...