I had to rebuild a Panasonic CF-50. I didn't have drivers on disk to reinstall and my only option of OS was XP with SP2 already installed. I downloaded the missing drivers from the Panasonic site. But, I couldn't install any of them. When I tried to run their .exe I would get the message 'this does NOT support'. Yeah that's all it said.
So I used WinRAR to extract the files from the .exes. Once I had the files extracted I could run the setup, or just point to the driver file. I still could not get the video drivers to install. I ended up using Mobility Modder http://www.driverheaven.net/modtool.php.
I followed the instructions on the website (msxml update, and .Net install) and pointed the modder to the drivers I had extracted. It fixed them and I was able to install the video drivers.
Tuesday, March 31, 2009
Friday, February 20, 2009
Enabling Firewall Logging in Vista for troubleshooting purposes
The idea here is if you are having some kind of issue on your home network and you want to see if you are having a firewall issue, enabling the firewall logging of dropped packets can help with troubleshooting. Here is how to enable logging for dropped packets.
Enabling firewall logging in Windows Vista
With Control Panel in Classic View
Go To Start>Control Panel>Administrative Tools>Windows Firewall with Advanced Security
On the right click Properties
Click Private Profile Tab
Under Logging Click Customize button
Next to ‘Log dropped packets:’ do the pulldown and select Yes.
Click OK
If you want to log for Domain (not necessary unless your system is in a domain) or if you want to log for Public, click the tabs and repeat the steps above to enable logging for dropped packets.
Click OK
Close the Windows Firewall with Advanced Security window.
Now if your firewall blocks something on your home network you should be able to see it in the log.
To check the log open this file:
C:\Windows\system32\LogFiles\Firewall\pfirewall.log
Thursday, February 05, 2009
Dealing with 'invalid' filenames in Windows ("Cannot read from the source file or disk")
Occassionaly I run into this issue. A person has copied over a file created by a Mac onto a Windows system, due to illegal or invalid naming, the file cannot be deleted or read.
Another issue might be someone saved something and the path was too deep. Now the data is problematic - it cannot be copied from the system, deleted, renamed, whatever.
I learned something really cool today thanks to another blogger (http://blog.dotsmart.net).
Please read this post:
http://blog.dotsmart.net/2008/06/12/solved-cannot-read-from-the-source-file-or-disk/
I don't want to copy his work but I will say that you can get Windows to ignore the invalid elements by prefixing paths with \\?
For example: "\\?\C:\Documents and Settings\user\filewithdotatend."
This allows commands like C:\>ren "\\?\C:\Documents and Settings\user\filewithdotatend." "filenamewithoutdot"
Now the file is usable, deletable, whatever.
This is so cool. I had no idea. Thanks to Duncan Smart’s Weblog !
Sunday, January 18, 2009
Transcode 360 choppy playback - stutters and pauses
I recently went watch a movie on my xbox 360 using MyMovies and Watch Stream, which utilizes Transcode 360 to encode the movie. The movie kept pausing and stuttering. It was not a CPU issue. I stopped the transcode service on the Media Center (a reboot of the machine will accomplish the same, getting it to stop transcoding), opened the Transcode 360 Configuration Utility and on the left click on Advanced. On the right, at the bottom I checkmarked 'Downmix multi-channel AC3 to stereo MPEG audio' (I had it unchecked from some previous testing I was doing). I then started the Transcode 360 service (if you rebooted you don't need to do this). I then tried that same movie and it played very nicely. No stuttering or pausing.
Thursday, January 08, 2009
Using Symantec Endpoint Protection in Safe Mode - Dealing with service not running error
Sometimes it is necessary to do an Antivirus scan while in safemode. I have noticed an issue with Symantec Endpoint Protection. After booting into safemode and attempting to launch Symantec Endpoint Protection, an error appears which says "It appears that the Symantec Management Client service is not running. You will not be able to manage network protection settings through the main user interface until it is running. Do you want to start the service now?"
It seems you would want to say Yes, but that will not work. You must choose No. Then the user interface will load and you can scan. You may receive a notice about realtime protection being disabled. For this purpose, that can be ignored.
It seems you would want to say Yes, but that will not work. You must choose No. Then the user interface will load and you can scan. You may receive a notice about realtime protection being disabled. For this purpose, that can be ignored.
Wednesday, December 31, 2008
Reauthoring (ripping with changes) a DVD with DVDShrink (preguide for use with Transcode 360)
DVDShrink is a great free tool. Download it here:
http://www.softpedia.com/get/CD-DVD-Tools/CD-DVD-Rip-Other-Tools/DVD-Shrink.shtml
DVDs are encrypted. I use AnyDVD to decrypt the disks. AnyDVD is not expensive, runs in the background, and saves you the work of first decrypting the disk. If you do not want to buy AnyDVD (from slysoft) you can use DVDDecrypter:
http://www.dvddecrypter.org.uk/
Before you begin decrypt the dvd, or have AnyDVD installed and running (you will have a little fox head on the systray to know it is running)
After installing, open DVDShrink.
Insert a DVD into your DVD drive.
Give it a moment to read the disk.
Click the Open Disc button.
You should see your drive and movie listed, choose it.
DVDShrink will analyze the disc.
When it is done you will see something like this:
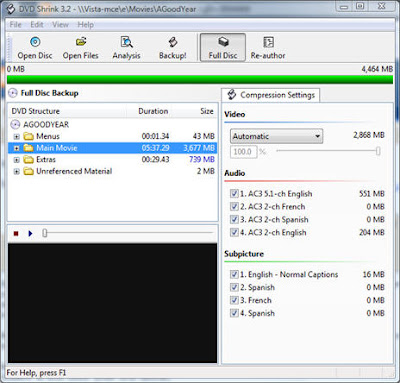
Because I watch movies using Transcode 360 and MyMovies, there are certain things I do to ensure the audio is correct and to not have to sit through all of the trailers. My guide will encorporate this:
Next, click the Reauthor button.
You will see something like this. The main movie is almost always title 1.
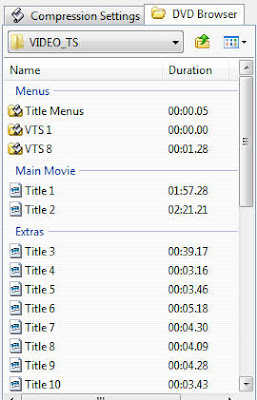
Drag and drop title 1 from the right to the left pane. We've now told DVDShrink we only want the movie itself. If you want to make sure you are getting the right thing, highlight the title and click the play button in the little preview pane and you will see what it is. If it is the type of disc that has both widescreen and normal this will help you determine which is the widescreen and which is the 4:3 version.
Now that you have the movie, click the Compression settings tab. Deselect all of the audio tracks except the one you want. If you are English, you'll want the English 5.1. Since we cannot use subtitles on a transcoded movie, you can deselect all of the subtitles. This will make the final file smaller.
Let me add here, if you want the disc, in it's entirety, you do not need to reauthor just click Full Disk.
Now we have what we want click the backup button. Choose how you want it outputted. If you want .vob files and such, choose Hard Disk. If you want an .ISO, choose .ISO image file. Below that, choose where to write the file(s) to. Click OK.
DVDShrink will now create your movie.
Firewall exceptions for Transcode 360
If you need to manually set your firewall exceptions for Transcode 360 here are the settings:
1) Open port 1401 (TCP).
This is using Control Panel with Classic View under Vista-32 bit
Go to Start>Control Panel>Administrative Tools>Windows Firewall with Advanced Security
On the left highlight Inbound Rules
On the right click click New Rule
Choose Port, Click Next
Dot next to TCP, dot next to Specific local ports. In the box type 1401. Click Next
Dot next to Allow the connection. Click Next
On the ‘When does this rule apply’ you can leave all selected if you want but technically you should only need ‘Private’ if when you set up your media center’s network connection you selected home which is private. Leaving the other boxes selected will not hurt anything.
In the Name box put something like T360
Click Finish.
Now under your inbound rules you will see one with the name you specified above (T360). Double click the rule.
Click the Scope tab.
In the Remote IP Address section put a dot next to ‘These IP Addresses:”.
Click the Add button
Put a dot next to ‘Predefined set of computers:’.
Use the pull down and select ‘Local subnet’.
Click Ok.
Click Ok.
That firewall rule is done. We’ve opened the port 1401 on the Media Center for all local traffic (your house).
2) Add Transcode360.exe and Transcode360Tray.exe to the allowed applications
Actually, I don't know that you need to add the exceptions specified in 2). I noticed that I did not add these to my firewall. I am not at home right now to test, but it may be that just port 1401 is all that is required. If you want to add exceptions for the Trascode processes you can. You can use my instructions above but near the beginning instead of choosing port, choose a program, and then browse to the program (C:\Program Files\Transcode360\Transcode360.exe). The rest of the setting will match the instructions above.
Vista users - if you need help with this have a look at this document:
http://windowshelp.microsoft.com/Windows/en-US/Help/4da18300-9044-47b6-9038-595c78db81ab1033.mspx
If you still need help you can email me aamjohns@[nospam]yahoo.com (remove the [nospam] part.
If you want to enable firewall logging to help troubleshoot have a look at this blog post:
http://tobias-tobin.blogspot.com/2009/02/enabling-firewall-logging-in-vista-for.html
Subscribe to:
Posts (Atom)
-
*****Transcode 360 will not work with MyMovies running on 64-bit operating systems. If you are using something like Vista Ultimate 64-bit yo...
-
I encountered this error using Office 2016 (32-bit) on Windows 7 x64. Logged on to the system as a User, I opened Control Panel>Mail...
-
 Downloads MSI-Installer or Zip of Executable Instruction Manual PDF Description I started creating instructions similar to: Acc...