This tool should only be used with StarkCovers version 6.23.2009 or earlier.
Requirements:
1) StarkCovers by Tyborg
2) .Net Framework 2 installed
3) Download my StarkCoversGUI tool and extract it into the same folder as your StarkCovers.exe
Update:
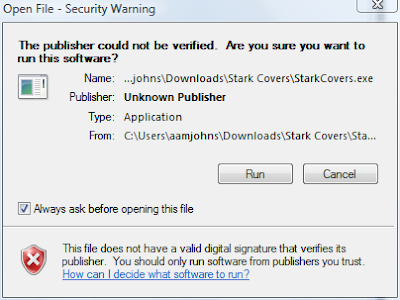
If you already have my tool and you updated your version of starkcovers.exe, you will need to redownload my tool and replace the one you already have. Something was changed in the starkcovers 6.23.2009 version that broke my tool. I have fixed my tool in response to this change. Also, when you click preview you may see this:

Uncheck 'Always ask before opening this file' and click Run. This is part of the problem that occurred with the updated StarkCovers.exe. Windows see's the executable as a program 'from another computer' and does not trust it. This prompt is for you to give permission for starkcovers.exe to be run.
What's it for:
I've been using Media Browser on my new Windows 7 MCE machine. Media Browser is a free media aggregator plugin for Media Center. On the Media Browser forum I saw Tyborg's tutorial for StarkCovers in Media Browser. Tyborg's tool is very cool! After you download it, and extra the files, you run a batch file to modify your movie covers. Being new to all this, I didn't really know what the different options would look like (ex: clearcase, sidelogo, banner, etc). So I spent a good amount of time editing the command line, modifying a single movie cover, and then viewing it in Media Browser. I had to do this to see what I liked and how it looked in Media Browser.
I decided to make a GUI form for Tyborg's program. This GUI offers a couple of conveniences. You can select options, and then do a Preview to get an idea of what the cover will look like. Next, you can run it against a movie folder, or all your movies, by selecting the options, selecting the movie folder, and clicking run. This should be easier to deal with for people not familiar with command lines and such.
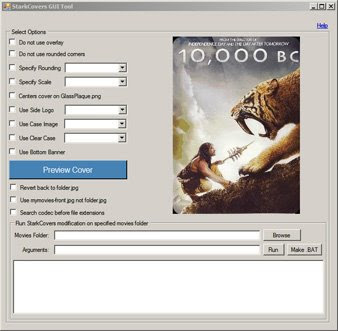
This is what the tool looks like:

Using:
After you have downloaded the GUI tool and put it in the same folder as your StarkCovers.exe, run the StarkCoversGUI.exe. This tool expects a "Sample" folder in the same directory it runs from. The first time you click Preview, if the Sample folder is not there, it will prompt you about it, and give you the option of automatically creating the folder.
Next, this tool expects there to be at least a folder.jpg file in the Sample folder. This is what the tool will use to generate previews. Copy the folder.jpg file from one of your movies and put it in the Sample folder, or, the tool will offer to download one into the folder for you (it's a 10,000 BC cover). Also, if you want to test with the mymovies.xml functionality, put one of the xml files in the Sample folder also, or, when you let it download the samples I posted, it will get a mymovies.xml for you.
Now the tool should be ready to go. Choose options and click Preview Cover button to get an idea of what the cover will look like. This just gives you an idea. The image has been shrunk and it may not look as good as it will in Media Browser. But, it give you an idea. Also, if you want to see a better image, click the Preview image and an unshrunk copy of the image will be shown.
If you want to use arguments I have not precreated checkboxes for, you can type them in the Arguements box. Both Preview and Run will use what is in the Arguments box.
If you want to change your sample cover, copy a new folder.jpg to the Sample folder. Whatever you want to use as your sample for previewing is obtained from the Sample folder.
When you are ready to apply the StarkCovers look to your movie covers, choose a Movie Folder. The path can be typed or browsed to using the Browse button. Choose the root folder of all your movies to have the StarkCovers look applied to all movies contained within. If you just want to modify one movie, choose its folder.
Once the options are selected, and the movie folder is selected, click the Run button and StarkCovers will run using the selected settings.
To undo, select the Revert back to folder.jpg options and run again.
To export settings to a .bat file, click the Make .BAT button.
Just a heads up, the conversion process can take a while. While it is running, the Run button will remain greyed out. When it is finished, you will see "Job complete" in the box at the bottom and the Run button will become available again.
Troubleshooting:
If you get the error "The application failed to Initialize properly (0xc0000135)" it means most likely you need to install .Net Framework 2 or update your .Net Framework 2 (service packs or updates).

10 comments:
Nice tool! Thank you!
Great job, thank you. I never tried out the stark cover thing, but with you GUI it's so easy!!!
Cool. Glad you like it.
Great GUI. So easy, so functional. try to get it integrated within StarkCovers
cheers
Thanks! Yes, Tyborg and I have talked. I guess another person is making a GUI in C# and I think Tyborg is going to try and use that one with his app. If not, I may code something. We will see what happens.
great job!! it simplifies the things a lot !!
thanks!
it doesn't seem to work any longer with starkcover 3.23.2009
Ok, I'll check into it.
I found the problem and updated my program so it works. Something must have been changed in starkcovers.exe that tripped up my program. If you get an updated copy of starkcovers and get an error when you click the Preview button, or Run button, download my newer gui and replace the existing one. It should start working again.
thanks for qucikly fixing!
Post a Comment