This is an older version of transcode 360. Even though it is called 4.6, it is an earlier version than 1.6.3. You should be using 1.6.3. I'm only putting this file up for people that may want it for some reason.
This is the first .Net 2 port by James. I am making it available in case anyone needs it. This is version 4.6. This is an earlier version than 1.6.3.
Download
Tuesday, June 23, 2009


Sunday, June 21, 2009
Script to change or remove genres in movie xml files
Download
Download Scripts
Version change 09/08/2009 - Now removes duplicate genres from an xml file. For example, if it has the genre 'comedy' three times, it will automatically remove the extra two 'comedy' genres.
Intro
There may be a better way to do this, but this is how I've been doing it and I wanted to make it available to others. If you are using Media Browser and go to sort by Genre, there may be genres you don't want. Or there may be genres that you want renamed. The scripts I am posting will allow you to do both, genre substitutions and genre removals from .xml files (ie: mymovies.xml).
I know it's not fun to read a ton of instructions so I will try to make this short, but I recommend you read this so you know how to use the scripts. If you have questions you can post in the comments or email me.
Overview of the scripts
Below is a list of the scripts and what they do. Before you run any of them, you need to edit the settings in the _Settings.txt file.
BuildGenreList.vbs script
I recommend you run this script first. It will look through all of the movie xml files and will build a list of each unique genre. You will use the results of the script (Genres.txt) to tell the next script what to do.
ChangeGenres.vbs script
This script takes your desired changes and implements them by modifying the xml files that need the specified changes.
RestoreFromBackup.vbs script
This script restores the original .xml files before changes were applied. MakeBackup must be =True in the settings file before running ChangeGenres.vbs if you want to make backup copies.
Using the scripts
Start off by extracting the .zip file into a folder. You want all the scripts and related text files to be in the same folder.
Open the _Settings.txt file. There are some instructions inside but basically here's what you will do.
1) Folders line. Here you set the folder or folders you want to run the scripts against. I have 3 folders that have movies, so for me this line reads Folders=E:\Movies,F:\Movies,G:\Movies. If you only have one movie folder (ex: C:\My Movies\Movies) then your's will read Folders=C:\My Movies\Movies. Separate more than one path with a comma (like my example above).
2) File line. This tells the script the name of the .xml file you want to process. For most people this will be mymovies.xml. So it would read File=mymovies.xml
If your setup uses a different .xml file just set it to be the name of your xml file. Ex: File=yourfile.xml
3) ShowCompletedBox line. If you want to know when the script is finished use ShowCompletedLine=True. If you are running the scripts as a schedule task and you don't want interaction, set it to False. If you have a lot of movies, the script will take a little bit. It's not too bad though. In testing it was about 3 minutes to process 100 movies.
4) MakeBackup line. If you want a backup copy of the .xml file before it gets changed, set this to True. Ex: MakeBackup=True. This will create a file called mymovies.xml.bak (or whatever your file is) and will be the .xml file before changes were made to it.
These settings are used by all scripts. So the first thing you want to do is open _Settings.txt file and edit the settings.
Building a list of genres
Now you can run the BuildGenreList.vbs script. While it is running (same goes for the other script) there will be a file in the folder called _StatusLog.txt. Open this file and you can see how far along the script is. While it is open you will not see the new data being written. After you close it you can re-open it and get refreshed progress. Running this script is optional. If you want to skip it, just create a text file called Genres and in it put the stuff you want changed. Something=Something Else to change, or Something=- to remove.
When it completes, and you will get an annoucement if you set ShowCompletedBox=True, you will have a Genres.txt file in the folder. Open it and you should see each genre in your collection.
Making Genre Changes
You will set how you want things changed using the Genres.txt file.
1) To substite a genre use this syntax: something=something else. So if I want Feel Good changed to Comedy I would find Feel Good in the text file and follow it with =Comedy. So, Feel Good=Comedy. That will change any genre called Feel Good to be Comedy.
Example: Suspense/Thriller=Thriller
2) To remove a genre, find it in the text file and follow it with =-. That's an equals sign and then a minus sign. This will completely remove the genre from the xml files.
Example: Monster Movies=-
Now run the ChangeGenres.vbs script. Again, you can check on it's progress by opening the _StatusLog.txt file. This will tell you what movies have been changed and any actions performed. If, in the _Settings.txt file you have MakeBackup=True, when this runs it will make a copy of the xml file before changes with a .bak extension. When the script finishes the _StatusLog.txt file will have a "Done" line
Doing a Restore
Provided you had MakeBackup=True set in the settings file before you ran the ChangedGenres.vbs script, you will have the ability to restore your original .xml files. The RestoreFromBackup.vbs script also uses the settings in the _Settings.txt file to know what directories to run against. You can also have it tell you when done. And, the progress, and changes, are recorded in the _StatusLog.txt file.
Use the scripts at your own risk. During my testing they are working as designed.
Troubleshooting
I have not tested this with Vista's UAC (User Account Control) enabled. If you have the UAC on then you may need to right click the script and choose 'Run as Administrator' before running them.
When you start the Genres.txt file is empty. You need to either run the BuildGenreList.vbs script, or manually edit the file to have your desired changes.
If you specified an invalid folder it will tell you in the _StatusLog.txt file. If you made a syntax error in the Genres.txt file either no changes will occur where the syntax error is, or you will get incorrect results. If something gets blundered, and you had MakeBackup=True, you can run the RestoreFromBackup.vbs script and it will restore you original .xml files.
I do not have On Error Resume Next enabled in the scripts. That way, if an error occurs the script will stop. If that happens, you can write down the error, or take a screenshot and send it to me.
Download Scripts
Version change 09/08/2009 - Now removes duplicate genres from an xml file. For example, if it has the genre 'comedy' three times, it will automatically remove the extra two 'comedy' genres.
Intro
There may be a better way to do this, but this is how I've been doing it and I wanted to make it available to others. If you are using Media Browser and go to sort by Genre, there may be genres you don't want. Or there may be genres that you want renamed. The scripts I am posting will allow you to do both, genre substitutions and genre removals from .xml files (ie: mymovies.xml).
I know it's not fun to read a ton of instructions so I will try to make this short, but I recommend you read this so you know how to use the scripts. If you have questions you can post in the comments or email me.
Overview of the scripts
Below is a list of the scripts and what they do. Before you run any of them, you need to edit the settings in the _Settings.txt file.
BuildGenreList.vbs script
I recommend you run this script first. It will look through all of the movie xml files and will build a list of each unique genre. You will use the results of the script (Genres.txt) to tell the next script what to do.
ChangeGenres.vbs script
This script takes your desired changes and implements them by modifying the xml files that need the specified changes.
RestoreFromBackup.vbs script
This script restores the original .xml files before changes were applied. MakeBackup must be =True in the settings file before running ChangeGenres.vbs if you want to make backup copies.
Using the scripts
Start off by extracting the .zip file into a folder. You want all the scripts and related text files to be in the same folder.
Open the _Settings.txt file. There are some instructions inside but basically here's what you will do.
1) Folders line. Here you set the folder or folders you want to run the scripts against. I have 3 folders that have movies, so for me this line reads Folders=E:\Movies,F:\Movies,G:\Movies. If you only have one movie folder (ex: C:\My Movies\Movies) then your's will read Folders=C:\My Movies\Movies. Separate more than one path with a comma (like my example above).
2) File line. This tells the script the name of the .xml file you want to process. For most people this will be mymovies.xml. So it would read File=mymovies.xml
If your setup uses a different .xml file just set it to be the name of your xml file. Ex: File=yourfile.xml
3) ShowCompletedBox line. If you want to know when the script is finished use ShowCompletedLine=True. If you are running the scripts as a schedule task and you don't want interaction, set it to False. If you have a lot of movies, the script will take a little bit. It's not too bad though. In testing it was about 3 minutes to process 100 movies.
4) MakeBackup line. If you want a backup copy of the .xml file before it gets changed, set this to True. Ex: MakeBackup=True. This will create a file called mymovies.xml.bak (or whatever your file is) and will be the .xml file before changes were made to it.
These settings are used by all scripts. So the first thing you want to do is open _Settings.txt file and edit the settings.
Building a list of genres
Now you can run the BuildGenreList.vbs script. While it is running (same goes for the other script) there will be a file in the folder called _StatusLog.txt. Open this file and you can see how far along the script is. While it is open you will not see the new data being written. After you close it you can re-open it and get refreshed progress. Running this script is optional. If you want to skip it, just create a text file called Genres and in it put the stuff you want changed. Something=Something Else to change, or Something=- to remove.
When it completes, and you will get an annoucement if you set ShowCompletedBox=True, you will have a Genres.txt file in the folder. Open it and you should see each genre in your collection.
Making Genre Changes
You will set how you want things changed using the Genres.txt file.
1) To substite a genre use this syntax: something=something else. So if I want Feel Good changed to Comedy I would find Feel Good in the text file and follow it with =Comedy. So, Feel Good=Comedy. That will change any genre called Feel Good to be Comedy.
Example: Suspense/Thriller=Thriller
2) To remove a genre, find it in the text file and follow it with =-. That's an equals sign and then a minus sign. This will completely remove the genre from the xml files.
Example: Monster Movies=-
Now run the ChangeGenres.vbs script. Again, you can check on it's progress by opening the _StatusLog.txt file. This will tell you what movies have been changed and any actions performed. If, in the _Settings.txt file you have MakeBackup=True, when this runs it will make a copy of the xml file before changes with a .bak extension. When the script finishes the _StatusLog.txt file will have a "Done" line
Doing a Restore
Provided you had MakeBackup=True set in the settings file before you ran the ChangedGenres.vbs script, you will have the ability to restore your original .xml files. The RestoreFromBackup.vbs script also uses the settings in the _Settings.txt file to know what directories to run against. You can also have it tell you when done. And, the progress, and changes, are recorded in the _StatusLog.txt file.
Use the scripts at your own risk. During my testing they are working as designed.
Troubleshooting
I have not tested this with Vista's UAC (User Account Control) enabled. If you have the UAC on then you may need to right click the script and choose 'Run as Administrator' before running them.
When you start the Genres.txt file is empty. You need to either run the BuildGenreList.vbs script, or manually edit the file to have your desired changes.
If you specified an invalid folder it will tell you in the _StatusLog.txt file. If you made a syntax error in the Genres.txt file either no changes will occur where the syntax error is, or you will get incorrect results. If something gets blundered, and you had MakeBackup=True, you can run the RestoreFromBackup.vbs script and it will restore you original .xml files.
I do not have On Error Resume Next enabled in the scripts. That way, if an error occurs the script will stop. If that happens, you can write down the error, or take a screenshot and send it to me.
Thursday, June 18, 2009
Graphical User Interface (GUI) for Tyborg's StarkCovers program
Hold up! As of the StarkCovers 6.30.2009 release my gui is once again broke. I'm not doing this anymore. Sorry.
This tool should only be used with StarkCovers version 6.23.2009 or earlier.
Requirements:
1) StarkCovers by Tyborg
2) .Net Framework 2 installed
3) Download my StarkCoversGUI tool and extract it into the same folder as your StarkCovers.exe
Update:
If you already have my tool and you updated your version of starkcovers.exe, you will need to redownload my tool and replace the one you already have. Something was changed in the starkcovers 6.23.2009 version that broke my tool. I have fixed my tool in response to this change. Also, when you click preview you may see this:
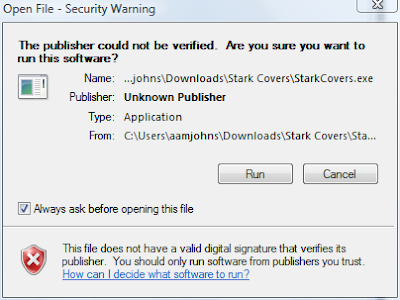
Uncheck 'Always ask before opening this file' and click Run. This is part of the problem that occurred with the updated StarkCovers.exe. Windows see's the executable as a program 'from another computer' and does not trust it. This prompt is for you to give permission for starkcovers.exe to be run.
What's it for:
I've been using Media Browser on my new Windows 7 MCE machine. Media Browser is a free media aggregator plugin for Media Center. On the Media Browser forum I saw Tyborg's tutorial for StarkCovers in Media Browser. Tyborg's tool is very cool! After you download it, and extra the files, you run a batch file to modify your movie covers. Being new to all this, I didn't really know what the different options would look like (ex: clearcase, sidelogo, banner, etc). So I spent a good amount of time editing the command line, modifying a single movie cover, and then viewing it in Media Browser. I had to do this to see what I liked and how it looked in Media Browser.
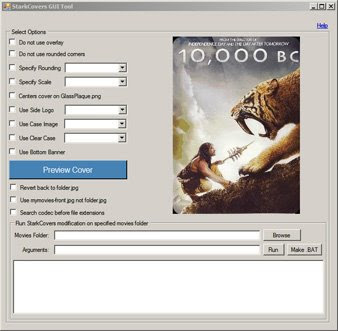
I decided to make a GUI form for Tyborg's program. This GUI offers a couple of conveniences. You can select options, and then do a Preview to get an idea of what the cover will look like. Next, you can run it against a movie folder, or all your movies, by selecting the options, selecting the movie folder, and clicking run. This should be easier to deal with for people not familiar with command lines and such.
This is what the tool looks like:
Using:
After you have downloaded the GUI tool and put it in the same folder as your StarkCovers.exe, run the StarkCoversGUI.exe. This tool expects a "Sample" folder in the same directory it runs from. The first time you click Preview, if the Sample folder is not there, it will prompt you about it, and give you the option of automatically creating the folder.
Next, this tool expects there to be at least a folder.jpg file in the Sample folder. This is what the tool will use to generate previews. Copy the folder.jpg file from one of your movies and put it in the Sample folder, or, the tool will offer to download one into the folder for you (it's a 10,000 BC cover). Also, if you want to test with the mymovies.xml functionality, put one of the xml files in the Sample folder also, or, when you let it download the samples I posted, it will get a mymovies.xml for you.
Now the tool should be ready to go. Choose options and click Preview Cover button to get an idea of what the cover will look like. This just gives you an idea. The image has been shrunk and it may not look as good as it will in Media Browser. But, it give you an idea. Also, if you want to see a better image, click the Preview image and an unshrunk copy of the image will be shown.
If you want to use arguments I have not precreated checkboxes for, you can type them in the Arguements box. Both Preview and Run will use what is in the Arguments box.
If you want to change your sample cover, copy a new folder.jpg to the Sample folder. Whatever you want to use as your sample for previewing is obtained from the Sample folder.
When you are ready to apply the StarkCovers look to your movie covers, choose a Movie Folder. The path can be typed or browsed to using the Browse button. Choose the root folder of all your movies to have the StarkCovers look applied to all movies contained within. If you just want to modify one movie, choose its folder.
Once the options are selected, and the movie folder is selected, click the Run button and StarkCovers will run using the selected settings.
To undo, select the Revert back to folder.jpg options and run again.
To export settings to a .bat file, click the Make .BAT button.
Just a heads up, the conversion process can take a while. While it is running, the Run button will remain greyed out. When it is finished, you will see "Job complete" in the box at the bottom and the Run button will become available again.
Troubleshooting:
If you get the error "The application failed to Initialize properly (0xc0000135)" it means most likely you need to install .Net Framework 2 or update your .Net Framework 2 (service packs or updates).
This tool should only be used with StarkCovers version 6.23.2009 or earlier.
Requirements:
1) StarkCovers by Tyborg
2) .Net Framework 2 installed
3) Download my StarkCoversGUI tool and extract it into the same folder as your StarkCovers.exe
Update:
If you already have my tool and you updated your version of starkcovers.exe, you will need to redownload my tool and replace the one you already have. Something was changed in the starkcovers 6.23.2009 version that broke my tool. I have fixed my tool in response to this change. Also, when you click preview you may see this:

Uncheck 'Always ask before opening this file' and click Run. This is part of the problem that occurred with the updated StarkCovers.exe. Windows see's the executable as a program 'from another computer' and does not trust it. This prompt is for you to give permission for starkcovers.exe to be run.
What's it for:
I've been using Media Browser on my new Windows 7 MCE machine. Media Browser is a free media aggregator plugin for Media Center. On the Media Browser forum I saw Tyborg's tutorial for StarkCovers in Media Browser. Tyborg's tool is very cool! After you download it, and extra the files, you run a batch file to modify your movie covers. Being new to all this, I didn't really know what the different options would look like (ex: clearcase, sidelogo, banner, etc). So I spent a good amount of time editing the command line, modifying a single movie cover, and then viewing it in Media Browser. I had to do this to see what I liked and how it looked in Media Browser.
I decided to make a GUI form for Tyborg's program. This GUI offers a couple of conveniences. You can select options, and then do a Preview to get an idea of what the cover will look like. Next, you can run it against a movie folder, or all your movies, by selecting the options, selecting the movie folder, and clicking run. This should be easier to deal with for people not familiar with command lines and such.
This is what the tool looks like:

Using:
After you have downloaded the GUI tool and put it in the same folder as your StarkCovers.exe, run the StarkCoversGUI.exe. This tool expects a "Sample" folder in the same directory it runs from. The first time you click Preview, if the Sample folder is not there, it will prompt you about it, and give you the option of automatically creating the folder.
Next, this tool expects there to be at least a folder.jpg file in the Sample folder. This is what the tool will use to generate previews. Copy the folder.jpg file from one of your movies and put it in the Sample folder, or, the tool will offer to download one into the folder for you (it's a 10,000 BC cover). Also, if you want to test with the mymovies.xml functionality, put one of the xml files in the Sample folder also, or, when you let it download the samples I posted, it will get a mymovies.xml for you.
Now the tool should be ready to go. Choose options and click Preview Cover button to get an idea of what the cover will look like. This just gives you an idea. The image has been shrunk and it may not look as good as it will in Media Browser. But, it give you an idea. Also, if you want to see a better image, click the Preview image and an unshrunk copy of the image will be shown.
If you want to use arguments I have not precreated checkboxes for, you can type them in the Arguements box. Both Preview and Run will use what is in the Arguments box.
If you want to change your sample cover, copy a new folder.jpg to the Sample folder. Whatever you want to use as your sample for previewing is obtained from the Sample folder.
When you are ready to apply the StarkCovers look to your movie covers, choose a Movie Folder. The path can be typed or browsed to using the Browse button. Choose the root folder of all your movies to have the StarkCovers look applied to all movies contained within. If you just want to modify one movie, choose its folder.
Once the options are selected, and the movie folder is selected, click the Run button and StarkCovers will run using the selected settings.
To undo, select the Revert back to folder.jpg options and run again.
To export settings to a .bat file, click the Make .BAT button.
Just a heads up, the conversion process can take a while. While it is running, the Run button will remain greyed out. When it is finished, you will see "Job complete" in the box at the bottom and the Run button will become available again.
Troubleshooting:
If you get the error "The application failed to Initialize properly (0xc0000135)" it means most likely you need to install .Net Framework 2 or update your .Net Framework 2 (service packs or updates).
Tuesday, June 16, 2009
File displayed in PictureBox control became locked
I came across this issue and found this MS KB document very helpful:
Image file is locked when you set the PictureBox Image property to a file (Article ID: 309482 )
I was displaying an image in a picturebox control and then I was trying to overwrite the file, and display a new image. I could not overwrite the file. I could not rename it or delete it either.
Using a Filestream instead of FromFile resolved the issue.
If you run into this problem check out the MS KB document linked above.
Image file is locked when you set the PictureBox Image property to a file (Article ID: 309482 )
I was displaying an image in a picturebox control and then I was trying to overwrite the file, and display a new image. I could not overwrite the file. I could not rename it or delete it either.
Using a Filestream instead of FromFile resolved the issue.
If you run into this problem check out the MS KB document linked above.
Wednesday, June 10, 2009
Tring out Media Browser on Windows 7
I just set it up. I brought up my extender and clicked Media Browser on the ribbon (or whatever it's called). I got this error: Access to the path C:/ProgramData/media browser/Styles_DoNotEdit.mcml is denied.
I figured the extender account probably need access to the directory. So on Windows 7 I right clicked Computer>Manage>Expanded Users and Groups, Clicked User, got the name of the extender account (the account with mcx in the name) and then went back to the C:/Programdata/media browser directory, right clicked, chose security, edit, clicked Add, and added the extender account. I gave it modify (I tried read and execute but that was not enough, it needs modify). If you add another extender to your Media Center, you need to repeat this process for the new MCX account on your Media Center.
I figured the extender account probably need access to the directory. So on Windows 7 I right clicked Computer>Manage>Expanded Users and Groups, Clicked User, got the name of the extender account (the account with mcx in the name) and then went back to the C:/Programdata/media browser directory, right clicked, chose security, edit, clicked Add, and added the extender account. I gave it modify (I tried read and execute but that was not enough, it needs modify). If you add another extender to your Media Center, you need to repeat this process for the new MCX account on your Media Center.
Tuesday, June 09, 2009
Transcode 360 Installer Tool
New get you up and running quickly Transcode 360 installer tool download
New Version Available
There was an issue with the previous version. In the ServerAddress Reg Edit portion, it was filling in the box with IPv6 addresses in some cases. IPv6 addresses will produce an error like "A port was expected because of there is a colon present but the port could not be parsed". I wrote instructions below how to fix this, or you can uninstall the existing copy of the tool, download and install the new one, and just run the ServerAddress Reg Edit part again.
There was also an issue with one of the builds where it was not replacing the ffmpeg.exe properly. That has been fixed.
I also took out the .Net 1.1 checker and the files from the download. The tool is much smaller download now.
The latest build of the tool is 1.05
Introduction
There is more to getting Transcode 360 installed and working than just running that actual installer. This blog post outlines many of the steps required to get T360 up and running.
It's a bit tedious. Also, it's the number one reason people come to my blog - instructions on how to install T360.
I've made an installer tool that will take care of getting T360 setup for you. Basically, you should be able to run this tool and accomplish the same thing you would by reading the instructions and performing the different steps as you go.
You need .Net 2 Framework install to use this tool. If you don't have it you can get it here. I'm not sure, you may need to run Windows Update after the install and apply the .Net 2 service pack also.
The link to download the tool installer is at the top of this post.
When you open the tool, there is a link to instructions on the right. Have a look. The PDF version is much nicer on the eyes.
This tool is designed to get you up and running is you 1) are using Media Center 32-bit, 2) Have your movies stored on your Media Center. If you are using 64-bit, Transcode 360 probably will not work. If you are storing your movies on a NAS or another computer, you can still use this tool to get things setup, but you will need to go back and make some more adjustments for your enviroment. I have blog posts with instructions (and another tool).
Troubleshooting
When you try to watch a movie from your extender, and you get the error:
"A port was expected because of there is a colon present but the port could not be parsed."
It is probably that on the ServerAddress part, it used your systems IPv6 address, rather than the required IPv4 address. IPv6 addresses look like this xxxx:xxxx:xxxx:xxxx. To fix this you need to run the tool again, but only the ServerAddress Reg Edit part. In the box put your Media Center's IPv4 address in the box and click Run button. Reboot the Media Center and try your extender again. If you do not know you Media Center's IPv4 address do this:
New Version Available
There was an issue with the previous version. In the ServerAddress Reg Edit portion, it was filling in the box with IPv6 addresses in some cases. IPv6 addresses will produce an error like "A port was expected because of there is a colon present but the port could not be parsed". I wrote instructions below how to fix this, or you can uninstall the existing copy of the tool, download and install the new one, and just run the ServerAddress Reg Edit part again.
There was also an issue with one of the builds where it was not replacing the ffmpeg.exe properly. That has been fixed.
I also took out the .Net 1.1 checker and the files from the download. The tool is much smaller download now.
The latest build of the tool is 1.05
Introduction
There is more to getting Transcode 360 installed and working than just running that actual installer. This blog post outlines many of the steps required to get T360 up and running.
It's a bit tedious. Also, it's the number one reason people come to my blog - instructions on how to install T360.
I've made an installer tool that will take care of getting T360 setup for you. Basically, you should be able to run this tool and accomplish the same thing you would by reading the instructions and performing the different steps as you go.
You need .Net 2 Framework install to use this tool. If you don't have it you can get it here. I'm not sure, you may need to run Windows Update after the install and apply the .Net 2 service pack also.
The link to download the tool installer is at the top of this post.
When you open the tool, there is a link to instructions on the right. Have a look. The PDF version is much nicer on the eyes.
This tool is designed to get you up and running is you 1) are using Media Center 32-bit, 2) Have your movies stored on your Media Center. If you are using 64-bit, Transcode 360 probably will not work. If you are storing your movies on a NAS or another computer, you can still use this tool to get things setup, but you will need to go back and make some more adjustments for your enviroment. I have blog posts with instructions (and another tool).
Troubleshooting
When you try to watch a movie from your extender, and you get the error:
"A port was expected because of there is a colon present but the port could not be parsed."
It is probably that on the ServerAddress part, it used your systems IPv6 address, rather than the required IPv4 address. IPv6 addresses look like this xxxx:xxxx:xxxx:xxxx. To fix this you need to run the tool again, but only the ServerAddress Reg Edit part. In the box put your Media Center's IPv4 address in the box and click Run button. Reboot the Media Center and try your extender again. If you do not know you Media Center's IPv4 address do this:
- Go to Start>All Programs>Accessories>Command Prompt
- At the prompt type: ipconfig and then hit Enter key
- You should get some lines of information back. One will say IPv4 Address. Write down the address.
- Go back and run the installer tool. Type the address you wrote down into the box, and click the Run button to the right.
- Reboot the Media Center and try your extender again.
Monday, June 08, 2009
Subscribe to:
Posts (Atom)
-
I encountered this error using Office 2016 (32-bit) on Windows 7 x64. Logged on to the system as a User, I opened Control Panel>Mail...
-
 Downloads MSI-Installer or Zip of Executable Instruction Manual PDF Description I started creating instructions similar to: Acc...
 -
*****Transcode 360 will not work with MyMovies running on 64-bit operating systems. If you are using something like Vista Ultimate 64-bit yo...